Painting in Modes
Using Adobe PhotoShop’s Brush tool, you can lighten or darken portions of an image or create color-wash effects. And by doing the painting on an empty Layer, you protect the image, keeping the process reversible.
Select a Mode such as Vivid Light, Soft Light, Overlay, Lighten, Darken, Multiply, Screen, Color Burn, or Color Dodge. Each has a particular look. I call the technique Painting in Modes, but other PhotoShop photographers use various names.
Using the Brush tool allows you to lighten, darken, or apply tints, The results done in one Mode are retained when you switch to another, so you can select a Mode to apply a particular effect, then switch to another for a different effect.
This is different than picking Modes in the Layers pallet, where changing the Mode alters all previous brush strokes.
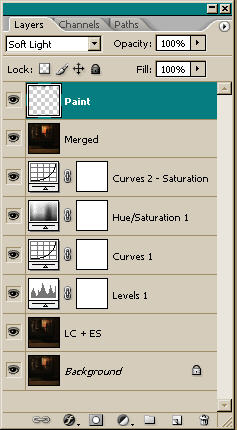
To Paint in Modes, first complete the usual image adjustments, including Local Contrast, Levels, Curves, Hue/Saturation, and Edge Sharpening. Then, merge all Layers into a new Image Layer: To do so, create an empty Layer, name it “Merged” then type: Shft-Ctrl-Alt-E (Mac: SHFT-CMD-OPT-E) to merge all visible Layers (those with an Eye icon showing) into the new Layer.
Now, create another empty Layer above the merged Layer and name it “Paint.” Leave it in Normal Mode and click on the Brush tool, which brings up the Brush (or Paintbrush) pallet at the top of the screen. In the Brush pallet, select brush size, Opacity, Flow, and the Mode you’d like to work with.
First set the default, Foreground black and Background white, by hitting “D.” Or, select the Picker and chose a hue to work with from the image. To darken that hue, make the Foreground a darker shade of the hue and the Background a lighter shade. Then you can switch between Foreground and Background as needed.
Still in the Brush pallet, set Opacity to 100% and Flow between 2% and 25%. Lower Flow rates let you build up changes slowly with good control. Different Modes require different Flow rates. Also, a light color may show changes quickly, while a mid-tone may show them more gradually.
Finally, select the Airbrush tool—the squiggly line and pen at the far right of the Brush pallet. With it selected, holding down the left mouse button applies color continuously.
Again: when you’re done painting in one Mode, you can switch Modes without affecting work done in the first. At the end of your session, if you find the effect too strong, switch to the Layers pallet and lower the Opacity of the entire Layer.
You can reverse the effect by switching from Foreground to Background (or vice versa) and painting in the opposite color. But, if the effect you want to undo was created in a different Mode, that won’t get back to exactly where you were—and it can be hard to remember which Mode you used for which effect, especially when you're switching hues. For this reason, if you’re doing extensive work in one Mode, keep that work in its own adjustment Layer. To paint in other Modes, create additional Layers.
Also be aware that extensive coloring can lead to a somewhat fuzzy appearance. This is because overlapping paint strokes become more opaque, eventually hiding details of the image. In that case, lower the Layer’s Opacity in the Layer pallet. Or you might try cloning in some image detail from other parts of the image.
Worst case, you could dump the entire Layer and try again. The good news is that the Image Layer is never affected. Once you get the hang of it, Painting in Modes lets you make precise changes to any part of your photo, down to the pixel level.
Image-Layer Opacity
A related technique applies effects by placing an Image Layer in a new Mode above its duplicate in Normal Mode. This is a global effect, unless you select portions of the image to adjust.
First, duplicate your final Image Layer and place it above the original, which should be in Normal Mode. Then change the Mode of the new Layer and lower the Opacity until you like the appearance. You can do this more than once, building up multi-layered effects—but note that each successive Layer has less impact on overall appearance.
If you want four stacked Image Layers to contribute equally to the overall look, set Opacity as follows: bottom Layer 100% ; next Layer up 50%; third Layer 33%; and fourth Layer 25%.
There's a formula: If you need to determine Opacity for multiple Layers use: Opacity = 100 / (1 + [number of layers below this layer] )
To determine the Opacity needed to ensure the fifth Layer has equal impact with the others, figure 100 divided by the five total Layers: Opacity = 100 / (1 + 4), or 20%; sixth Layer: 100/ (1 + 5) = 16.6%, rounding up to 17%, since Opacity is in whole numbers.
That’s how to keep all Layers equal in impact, but normally you’ll want Modes other than
Note: Any Layer below one at a 100% Opacity is invisible...so you only start counting from the highest 100% Layer. In the example here, for Vivid Light, the Painting Layer is the first 100% Layer and Vivid Light is the only Image Layer above it. So to make Vivid Light equal in impact, it would need 50% Opacity. Since the actual Opacity is 12%, it's influence is very modest.
Use the formula as a jumping off point for finding the needed Opacity. Don’t go crazy with the math, just understand the general principle. When working with a particular Layer, start with what the formula tells you is the “equal as” Opacity, then dial the percentage down until it looks right.
John Blackford, February 2007