Basics adjustments using a small JPEG—for trying out settings or resizing for the Web
I set my Canon 20D to create both a small JPEG and a RAW file with each shot—often using the JPEG to try out settings quickly or to post images on the Web. But if the image has problems—say blown highlights—the RAW file offers far greater latitude for making adjustments, since initial adjustments are not “baked into” the file.
For the Down ‘n Dirty Workflow, I sometimes make adjustments directly on the image instead of using separate Layers, but now that I've automated my main workflow, its often easier to run the action with Layers, leaving me with a complete trial version--with a nice small file size suitable for Web posting via Adobe's Save for Web option.
When I make adjustments directly on the image, I use Image/Adjustments/… This speeds up the process, and I can still go back by clicking the History Tab and selecting a previous state. If you want to be able to make changes after closing the session, use the Advanced Workflow, starting with the RAW file. The Down n' Dirty Workflow is a once-and-done deal. Best of all, Automate your typical workflow That runs so quickly you can go ahead an use Adjustment Layers.
The Down 'n Dirty sequence is, using PhotoShop: 1.) Copy the camera file, 2.) Rename and Save the file. 3.) Crop the image. 4.) Duplicate the Background Layer and name it Adjustments. 5.) Apply Local Contrast via Unsharp Mask. 6.) Adjust Levels. 7.) Adjust Curves. 8.) Set Saturation. 9.) Do Edge Sharpening via Unsharp Mask. 10.) Re-Save the file and Exit.
The reason to Duplicate the Background Layer is to maintain the original image as part of the file. This also lets you compare the adjustments applied to the original by clicking the “eye” icon on and off. (You can also click Ctrl-Z (Cmd-Z) to Undo or Redo the previous state.)
The Local Contrast settings described here increase light-dark contrast in adjacent areas, giving the image more "pop" and boosting apparent sharpness. Use it as well as traditional Edge Sharpening. Both are applied via the Unsharp Mask: Filter/Sharpening/Unsharp Mask, but using different settings.
After applying Local Contrast in Step 5, continue with adjustments of: Levels, Curves, and Hue/Saturation, on the same Adjustments layer. Finally, in Step 9, apply Edge Sharpening via the Unsharp Mask to the same Adjustments Layer. If the image looks good, you're done: Re-Save the file to the name you selected.
These basic steps are suitable for almost any digital photographic image and will deliver better results than "automatic" settings offered by PhotoShop.
Step by Step
1. Copy the camera’s digital files from your camera’s memory card (such as Compact Flash or SD) to two different hard disks; spot-check the images in both locations; then Format the memory card using Quick Format in My Computer (for a Windows PC).
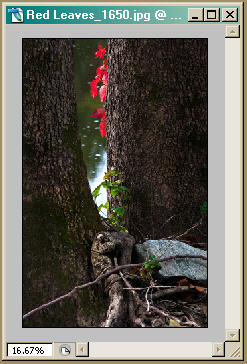
2. Open the JPEG file, then Rename and Save it to a different Folder than your archive of unedited images. Call the new Folder something like “Working” or “Wyoming Trip” to help identify it. Retain the camera-assigned image number as part of the new name. This makes finding the archive file easier later on. (For my file “Red Leaves-1650.JPG,” the camera file was “_MG_1650.JPG.”)
3. Crop the image but don’t alter the dimensions or resolution. For a file size below 2MB, the maximum print size you can get is around 5 x 7 inches @ 240 pixels/inch, without resampling. If you need a larger print than that, try 180 dpi. Otherwise, you should be working on the full-sized RAW file.
The small JPEG produced by my Canon 20D appears as 834KB to the computer, but opened in PhotoShop, it lists as 5.7MB. This discrepancy has to do with the compression system JPEG employs, but the bottom line is that the 8-bit
A small JPEG will open as something like 16 x 24 inches at 72ppi. If you plan to print the image, go to: Image/Image Size, uncheck the box “Resample Image,” then set the resolution to 240ppi. The new dimension will be 4.8 x 7.2 inches at 240ppi. With “Resample Image” Unchecked, dimensions are locked to the resolution, preventing changes to the image as you try out new settings. For online-only images, leave resolution at 72 dpi.
4. Duplicate the Background Layer and rename it “Adjustments.”
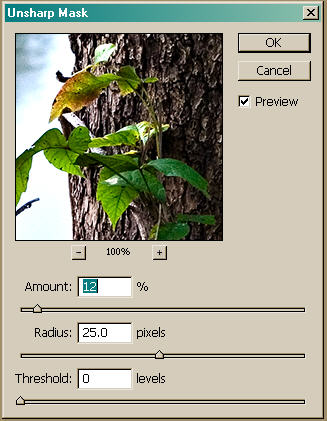
5. To apply Local Contrast Enhancement, select: Filter/Sharpen/Unsharp Mask.
Set: Amount to 10-15%; Radius to 20-30 pixels; Threshold to 0 levels. (“Local Contrast Enhancement” or "Local Area Contrast" are common names for the process. These are not official PhotoShop names.)
Click the Eye icon on and off to check the effect, or use Ctrl-Z (Cmd-Z). If you don’t like the results, use: Edit/Step Backward. Then redo the Unsharp settings.
Optional: To minimize halos or other color distortions, Click: Edit/Fade/Unsharp Mask, then change the Mode from “
6. To adjust Levels: select Image/Adjustments/Levels and slide the end points in to where the histogram first begins to rise. Adjust the mid-point slider (gamma) by eye.
7. Curves: select Image/Adjustments/Curves. Left-Click to set points at the three intersections of vertical/horizontal lines, then move the points straight up or down to adjust contrast. Try to make the new adjustment line a smooth S-curve.
8. Saturation: select Image/Adjustments/Hue-Saturation, then set the Saturation slider between 5% and 18%. You can also select individual colors and adjust the Saturation and Lightness of those to target particular areas of the image.
9. Edge Sharpening: select Filter/Sharpen/Unsharp Mask. Set: Amount = 65-100%; Radius = 1.0 pixels; Threshold = 0-12 levels. Use higher Threshold levels to blur excessive noise or grain. Immediately select: Edit/Fade Unsharp Mask/Luminosity to avoid color artifacts. An alternative for Edge Sharpening low-noise images is: 200-300%; 0.2-0.3 pixels; 0 levels.
Click the Eye icon On and Off to see the effect of your sharpening, or Ctrl-Z (Cmd-Z). If it’s not right, use: Edit/Step Backward (or the History window), then redo the settings. .
10. Re-Save the File to the same name you chose in Step 2 and you're done.
Note: The reason to perform Local Contast Enhancement before Levels is that the contrast adjustments alters maximum lightness/darkness in local areas of the image. That's how it produces the effect, but if you’ve already set the white and black points in Levels, these changes can cause Clipping—loss of image detail.
John B Blackford, Updated February, 2007