Image adjustments, starting with a RAW image file
Note: This section was revised in February 2007. If you have questions or commentss, e-mail: john@jblackford.com
This workflow for digital images includes steps needed to improve images, plus options. No single workflow can handle every variation, but applying these adjustments will improve clarity, contrast, color intensity, and sharpness. Of course, you can take the adjustments in many directions. For example, you might need a soft misty look rather than contasty and crisp.
There are limits to what any adjustments can accomplish: If focus is off in critical areas, the best you can do is mitigate the problem. That might save the image, but maybe not... Likewise, where highlights have been burned out, details may be lost forever.
However, RAW files contain data from the camera sensor before it’s been tweaked, so marginal highlight and shadow detail may be saved. The RAW file is analogous to a film negative before development—except that you can see the effect of your changes before you commit to them. In addition, you can process the RAW file twice, once for highlights, once for overall exposure, then combine the images later. In Photo Techniques see the link to a tutorial on Recovering Highlight Detail.
Also outlined here is a technique I call Painting in Modes. The method paints changes via the Paintbrush Tool to a Layer directly above the Image Layer, so you work non-destructively.
Select Layer/New, leaving the Mode as Normal. Then select the Paintbrush Tool and set the Mode in the Paintbrush (Brush) Pallet (which appears at the top of the screen) to the Mode you'd like to work in, such as Vivid Light. After you've made changes, you can switch to a different Mode, without affecting work done in the first. That's not true in the Layers Pallet: There, when you change Modes, all adjustments are affected.
In the Paintbrush Pallet, after selecting the Mode, set Opacity to 100% and the Flow to a low percentage, so changes can be built up slowly. Different Modes affect the image at differing rates, so you'll need to experiment> Start with Flow set between 4% and 15%. For Vivid Light, try 4% to 7%.
To paint, set Foreground and Background colors and switch from one to the other to lighten or darken. For strongest effect, set the default—Foreground black and Background white. You can also select a grey tone or use the Picker to select a color. The choice is determined by the effect you're going for. If you use the Picker to select an object in the image whose color you want to change, double click on the Foreground or Background color box. This opens a color pallet, where you can select colors brighter or darker than the one you first picked—so you can lighten or darken a particular hue.
Painting in Modes is great for altering parts of an image where quick touch-up is needed—and also for making in-depth changes.
You can also use a Layer Mask to good effect to lighten or darken parts of an image less dramatically. The Layer Mask gives you dodge-and-burn capabilities much more effective than the actual Dodge and Burn Tools.
To create a Layer Mask for lightening/darkening, create a new empty Layer; select Soft Light Mode, and check the box “Fill with Soft-Light-neutral color (50% grey).” Hit "D" to set the default: Foreground black and Background white. Then, paint in black to darken portions of the image on the Layer below or white to lighten, with Flow at 10% for starters. You can do the same with Overlay, Vivid Light, Hard Light, Linear Light, and Pin Light Modes. See the section Layer Masks for details [coming soon]. This works by altering the 50% grey of the Layer Mask, preventing you from taking any part of the image to fully black or white—not a bad thing for dodge-and-burn changes. Changes are easy to reverse, since you just switch from painting black to white to undo (or vice versa).
The Adjustment Steps described below offer more options than you'll typically need, but you decide. Also, if you automate your workflow, it's useful to include the extra options. The Action will pause where you can enter settings, but you can pass on without entering any—which I find easier than tweaking after running the Action. Steps below can be automated. See Automate Your Workflow!
Final Note: Generally, PhotoShop specialists recommend doing Edge Shaprening last. But Local Area Contrast (which also uses the Unsharp Mask) should be done before Levels, to avoid possible clipping. So I do Local Area Contrast before Levels and Edge Sharpening at the end, via a merged Layer that incorporates all earlier adjustments. The Unsharp Mask must be performed on an Image Layer.

Step by Step
1. Copy the camera’s digital files to two separate hard disks to safeguard your data. One of these disks should be an external
Spot check the copied images on both hard drives before you format the data card (such as Compact Flash or SD). Then, format using the computer’s utility, rather than the camera’s. (The thinking is that the computer is a bit less likely to botch the format operation than the camera.)
2. RAW Conversion Open an image and adjust Color Temp, if necessary; set Exposure, while watching the histogram to avoid clipping; move the Shadows slider, usually between 3 and 10, also avoiding clipping the shadows; set initial Saturation between 3% and 12%.
Color Noise Reduction: Select the Detail tab and move the slider for Color Noise Reduction to: 0% for
Optional Step: If you have a noise filter such as Noise Ninja, apply it now. Load the proper
3. Crop picture but leave the dimensions and resolution as high as possible. For an 8 Mpixel camera, that would be: 9.7 x 14.6 inches at 240ppi. Rename and Save the image as a TIFF or
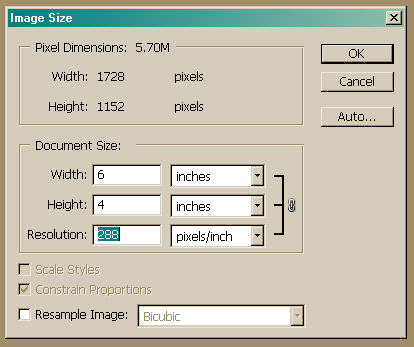
You can alter the image dimensions/resolution non-destructively later by Unchecking “Resample Image” under Image/Image Size. PhotoShop will alter the print resolution in synch with the changed dimensions, without altering the file size or total number of pixels. Most printers can handle a wide range of resolutions, so this lets you select the print size after making the image adjustments. Still, for critical work, it’s best to set print size and resolution before applying adjustments.
Try to keep the resolution above 240 dpi, though you can get away with as low as 180 dpi, especially for larger images, which are typically viewed further back.
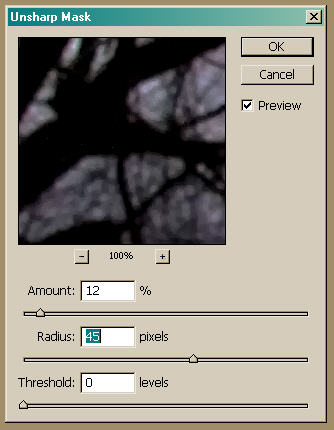
4. Local Contrast Enhancement Duplicate the Background Layer and rename it “LC" or "Local Contrast.” Select: Filter/Sharpen/Unsharp Mask. Then, set: Amount to 10-15%, Radius to 20-100 pixels, Threshold to 0 levels. Immediately select: Edit/Fade Unsharp Mask and change the Mode from
Local contrast is dependent on image size, even more than with edge sharpening, so file size shouldn't be changed after applying local contrast settings. I get good results when changing size with “Resample Image” unchecked, because resolution goes up as the dimensions go down. As a result, Local Contrast is operating on the same number of pixels in each case.
While a small file, less than 3MB, might require a Radius of 20-30 pixels, a full-sized TIFF or
Images containing larger areas to be affected (say, the side of a barn or house) require higher Radius pixel settings than those with small picture elements (such as small leaves in middle distance).
If the enhancement causes a halos around some picture elements, say branches against the sky, you can select only the part of the image that requires local contrast, make a Layer Mask with only the selected part visible and apply local contrast to that. But using the settings above, I don't have much trouble with halos.
5. Levels Select: Layer/New Adjustment Layer/Levels. Set the white and black points by moving the left and right sliders in until they reach the place where the histogram first begins to rise. (To avoid clipping, hold down
Now set the middle slider to adjust the gamma (overall brightness of the image). Moving the middle slider will not cause clipping.
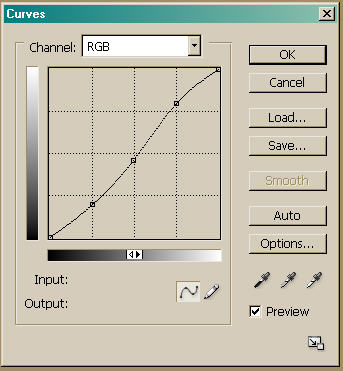
6. Curves Select: Layer/New Adjustment Layer/Curves. Left-click to set a dot at each of the three intersections of the vertical and horizontal lines. Move these dots straight up or down to create a smooth S-curve for good contrast.
7. Saturation: To tweak the Saturation (initially set during RAW conversion), select: Layer/New Adjustment Layer/Hue-Saturation. Adjust as needed, using Master to affect the entire image, or particular colors by choosing the drop-down menu next to Master.
8. Saturation via Curves: Curves/Saturation You can target the saturation of specific tonal areas in the image by selecting: Layer/New Adjustment Layer/Curves. Then change the Curves Mode from
You can also select specific color channels in the Curves/Saturation Mode by changing Channel from
Keep the effect subtle by maintaining a slight S-Curve, as you would for Curves in Normal Mode. It's a good idea to start by setting three points, one at each horizontal and vertical intersection of the Curves graph. Then move each point up and down about half way, just to see how the changes will apply. Reset the Curve to a straight diagonal line, then make your final adjustments, again by moveing each point up or down, but this time much less aggressively. See Curves/Saturation Mode.
Note: Once the Curves graph is open, you can't see which Mode is active, so make sure to set to Saturation Mode when the dialog box is open.
9. Lighten/Darken, via 50% grey Layer Mask: As noted, selecting Soft Light Mode and checking the box “Fill with Soft-Light-neutral color (50% grey)” will create a Layer above the image Layer. Painting in white or black at low opacity (or low Flow) will lighten or darken: Painting with black darkens; painting with white lightens. This is good for modest dodge and burn effects and is better than the Dodge-and-Burn tool. As noted, you can do the same with Overlay, Vivid Light, Hard Light, Linear Light, and Pin Light Modes.
10. Layer Masks to control intense adjustments: For more control or stronger effects, first: create an Adjustment Layer; then: Make any changes you want (for example strong saturation in a particular color range); finally: create a black Layer Mask via Layer/New Adjustment Layer/Invert. As you paint in white, the changes you made will begin to appear. The changes that aren’t visible on the layer will not affect the image, so you can create multiple Layers. Use one Layer Mask to alter a specific area, then use another to alter a different area.
To allow maximum control, set: Opacity at 100% and Flow between 4% and 20%. Select Airbrush mode: With the Paintbrush Tool selected, click the eyedropper-on-a curvy-line at the far right of the Paintbrush Pallet. In this mode, if you hold down the left mouse button, the flow continues.
When you’re done, you can reduce the effect overall by lowering the Opacity.
11. Paintng in Modes: Paint in Modes On a new Layer, with the Paintbrush tool selected, set the Mode at the top of the screen to: Soft Light, Overlay, Screen, Multiply, Darken, Lighten, Color Burn, Color Dodge, or Vivid Light Modes. Use the Picker to select a color and paint. Set Opacity to 100% and the Flow from 4% to 20%. This approach does not affect the image layer and can be completely reversed. Also, you can switch Modes at any time while preserving the changes you've made in another Mode.
But Note: The Modes referred to are those shown in the Paintbrush Pallet at the top of the screen (see image above), NOT the Modes window visible in the Layers Pallet. There, any change in Mode will be applied to the entire image, including previous Painting in Modes. ONLY change the Mode in the Paintbrush Pallet.
Each Mode applies a different effect, and you can change Modes and continue painting without altering the previous affect--as long as you only change Mode from within the Paintbrush Pallet.Vivid Light tends to increase contrast and intensity. Soft Light and Overlay are more subtle and require a higher Flow. Start with 4% to 7% for Vivid Light and 10% to 15% for Soft Light or Overlay Mode.
12. Merge Previous Layers: To ensure that the Layer to be sharpened contains all previous adjustments, you’ll need to Merge All Visible Layers into a New Layer. Do this by first creating a new Layer, ensuring it's at the top of the Layers stack, then typing: SHFT-CTRL-
13. Edge Sharpening: Rename the Merged Layer ES (Edge Sharpening) and go to: Filter/Sharpen/Unsharp Mask; set: Amount – 200% to 300%, Radius – 0.2 to 0.3, Threshold – 0. If you didn’t use Noise Ninja, try: Amount – 65% to 100%, Radius – 1.0, Threshold – 0 to 12. Use higher Threshold settings to smooth out noise.
Before doing anything else, select Edit/Fade Unsharp Mask and change the Mode to Luminosity.
14. Save Image Save As “Title-photo#” and retain all layers.
15. Test Print As noted, you can print various sizes by having Resample box Unchecked (Image/Image Size/ uncheck “resample image”). This locks dimensions to resolution, so as you alter one dimension, both the other dimension and the resolution change, while keeping the file size static.
Changing Image Size with Resample Unchecked, change the dimensions to fit on 8 ½ by 11 inch paper for a test print. Tweak the image as needed and proceed to the Final Print.
16. Final Print Make sure you’ve selected the proper paper profile and told the printer NOT to apply adjustments, but to let PhotoShop apply the settings: With an Epson printer, under [printer model xx] Properties, check
It’s also a good idea to double-check settings as you go. For some reason, as you alter paper type and orientation, you may choose an option in one menu, only to find it has not been changed in another. Whenever you see Properties, click it and make sure the settings that come up still match you’re intent.
For extremely large file sizes, you may need to Flatten the image and lower the resolution to reduce file size enough so the printer can handle it. For example, if you want a 16 x 20-inch print and have a large file (perhaps as much as 400MB from a drum scan of a large- or medium-format slide), you could easily set the resolution to 360ppi or higher—except that such a huge file may cause the printer to choke. (Mine did.)
If that happens, keep the dimensions at 16 x 20 inches, flatten layers, reduce resolution to, say, 288ppi or 240ppi, and Resample. Make sure to Check the box “Resample Image.” For draft prints, you can get suprisingly good results down to 180ppi. Now, try printing again. You can keep reducing the file size until it prints. For mine, that’s somewhere below 60MB. The giveaway that file size is the problem is when the printer churns out a print with part of the image missing.
When saving this flattened image with a smaller file size, include the output size and “flat” in the file name. For example, “Boat-2478-1620-flat.”
The mathematically optimal resolutions are: 240, 288, 320, 360, and 480. When you Uncheck the Resample Image box, resolutions will shift all over the map as you change the image dimensions. That’s okay, except for the above. For critical work, try to finesse the settings so you end up with one of the ideal resolutions.
John B Blackford, February 2007
