Automating PhotoShop requires some up-front effort, but once you’ve set up a PhotoShop Action and ironed out any kinks, you’ll speed up often-repeated operations, such as an image-adjustment workflow.
A PhotoShop Action is a script, a type of small program. To record one, select the double box at the bottom of the Actions palette. You’ll be asked to name the Action. The name you pick will always appear in the Actions palette, once the Action is recorded. When you're done, you can still change the Action, so don't be concerned about making things perfect the first time recording.
Keep things simple when you record by entering likely settings for each adjustment. When you play the Action, these will be the defaults.
Avoid defaults that go into secondary menus—like the Red channel in Curves. If you do, when you play the Action, you'll have to go to that color channel and manually fix the Red adjustments you set. If you do need to adjust the Curves’ color channels during playback, you can at a Pause that you'll add in a moment, but it’s best not to have to.
Try to use common settings when you record. There's a good chance you won't need to change much on playback. For Local Area Contrast with a 46MB file, I often use these Unsharp Mask settings: Percent = 12, Radius = 40, Threshold = 0. So, that’s what I entered during recording. If you do need to adjust the defaults, do can so at a Pause.
When you’re done recording, press Stop (the square box at the bottom of the Actions palette). Hitting Stop automatically saves the Action and adds it to the Actions palette.
When you’re ready to play your Action, click the folder tab labeled “Actions” or select Windows/Actions at the top of the screen. The Action you recorded will be visible in the Actions palette. Click the triangle at the bottom of the palette to Play it.
You can set the Action to save the image, with a Pause letting you name it.
With an Action recorded, you can open an image and play the Action, speeding your work dramatically.
Place Pauses and Stops in the Workflow
Before you play the Action, place Pause commands where you’ll want to enter settings. The Pause command is represented by a tiny square window icon to the left of an Actions function. The function could be “Make adjustment layer,” Duplicate current layer, or Unsharp Mask. Actions consists of a series of such one-line statements.
To enter Pause, click the empty box to the left of a function that needs one. If a check mark appears instead of the window icon, you’ve clicked in the wrong column. Of the two columns in the Actions window, the check marks are in the farthest-left column, while Pauses are next-to-left (between the checks and the Action descriptions). The check marks toggle a particular line on or off.
Some adjustments cannot be used with a Pause, such as Painting in Modes, which requires using the Brush tool. For these, there are Stops.
Stops are inserted via the Actions Palette Menu—which is accessed by clicking the right-facing triangle at the top right of the Actions palette. The Actions palette Menu will pop up. On an already-recorded Action, select the command just before where you want to place the Stop. Click Record (the circle at the bottom of the palette). Now click Insert Stop on the menu that appears when you click the triangle at the top of the palette. A window pops up, allowing you to add a message that will appear when you run the Action. Finally click Stop at the bottom of the palette to stop recording.
This inserts the Stop command in your Action. When you run the Action, it will stop there and display the message
Test-Run the Script
Run the script on a new image to check that everything is working properly. The Action should Pause at each line with a square window icon, after it has opened the adjustment (such as Levels or Curves). Once you enter the settings and hit OK, the script continues to the next function.
If you do need to adjust red, green, or blue channels in Curves, you can do so during the Pause, as part of the Curves adjustment. The script won’t move on until you’ve hit OK, even during multiple changes.
When you’re done and all adjustments have been made, Rename and Save the file. This Action automates adjustment operations, making Layer duplications, and so on—which speeds thing up, even though you’ll enter the settings manually. Also, using the script ensures that you won’t forget a step.
This particular Action is designed to begin once you’ve converted the file from RAW and run Noise Ninja or another third-party noise-reduction program. However, you could include running noise reduction or even adding Crop or Rotate Canvas to the Action. (When you use the Crop tool during recording, Crop becomes a line in the script. If you place a Pause at that line, you’ll be able to set actual crop lines during playback.)
Revisions: If there are any problems in the Action, simply delete the offending command (drag it to the Trashcan) and select the command just before the one you deleted. Click Record, then perform the correct adjustment. Finally, click Stop.
Step-by-Step
1. In PhotoShop, click on the Actions tab or select Window/Actions. To begin recording, click the double box “Create a New Action,” located at the bottom of the Actions window.
2. Name the Action something like “Basic Workflow” and click OK. Now you’re Recording. The circle at the bottom of the Actions window should be red.
3. Go through each step of your workflow and enter the adjustments needed for the image, while avoiding second-level settings. (Choose a different image to record, if the current one requires such complexities.)
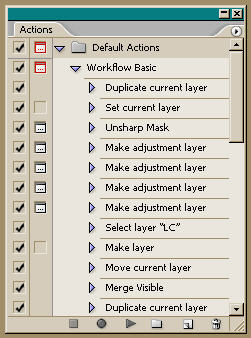
4. Basic Sequence (perform while recording):
a.) Duplicate Background Layer and rename it “LC” (local contrast).
b.) Filter/Sharpen/Unsharp Mask: Percent = 12, Radius = 40, Threshold = 0.
c.) Layers/New Adjustment Layer/Levels.
d.) Layers/New Adjustment Layer/Curves.
e.) Layers/New Adjustment Layers/Hue-Saturation.
f.) Layers/New Adjustment Layers/Curves: Rename “Saturation,” change Mode to Saturation.
See: Curves/Saturation
g.) Layers/New Layer Name the Layer Paint.
h.) Click on the Brush tool.
i.) Insrt Stop [When you run the Action, you'll be able to do Paint in Modes, as needed].
j.) Layer/New: Name the Layer “Painting” [see Painting in Modes].
k.) Merge all visible layers into the new layer, via: SHFT-CTRL-
l.) Layer: Filter/Unsharp Mask: Percent = 300, Radius = 0.3, Threshold = 0 (or 85, 1, 4).
m.) Name and Save the image file.
n.) Now click Stop to halt recording. The Action is almost ready to Play.
5. First enter Pause commands (called Modal Controls) wherever you’ll want to insert adjustments on
such as Local Contrast, Levels, Curves, and similar commands.)
6. Open a new image, Play the Action. Enter actual adjustments when the Action pauses.
7. Hit OK to continue the Action.
Revising An Action
As noted, after you've recorded the Action, you can open a new image file and Play the Action. You can enter values wherever you've checked a Pause box (termed inserting a Modal Control). You can also insert a Stop for opened-ended changes, such as Painting in Modes.
Even if things work perfectly, you'll probably re-think something. For me, it was recording adjustments on the Curves R-G-B channels on the first Action, as well as the need to insert a Stop, and one other change. So, I needed to revise the Action.
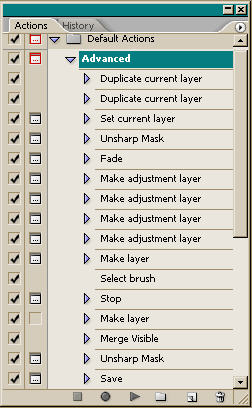
Revisions: To add the Stop, I selected the Action command located just before where I wanted the Stop. For me the reason for the Stop was to Paint in Modes: That uses the Brush tool , which can't be used with a Pause. So, my Stop needed to come before Make Layer, my Paint Layer. I clicked the triangle at the upper right of the Actions Palette, opening the Actions Palette Menu. I clicked Insert Stop and typed a message to display during plaayback.
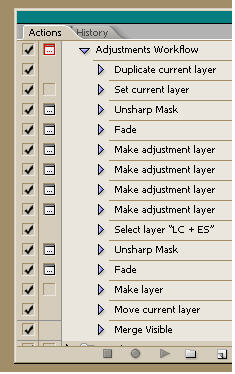
Then I hit Stop. After testing this change, I fixed the Curves settings, then went on to split my LC and ES Layer into two Layers,. Finally I added a Save command. Once you get the basics, recording and revising an Action is easy and a great time-saver.
Revise your Action as new ideas occur to you, or maintain several Actions for differing requirements.
John Blackford, December 2006 & February 2007